
TL;DR
Moving your rig into a closet or cabinet significantly reduces noise, but requires careful attention to ventilation and placement. Proper acoustic treatment and sealing make a huge difference in sound quality and heat management.
Imagine your loud, humming AI rig tucked away in a closet—silent at your desk, yet still powerful. That’s the magic of smart placement combined with targeted acoustic dampening and ventilation. It’s not about turning a room into a studio; it’s about choosing the right spot and making it work for you.
This guide cuts through the noise—literally. You’ll learn why moving your rig into a closet or cabinet is often the best fix, how to prevent it from overheating, and where to place sound treatment to get the clearest, quietest results. If you want your setup quiet, efficient, and easy to maintain, keep reading.
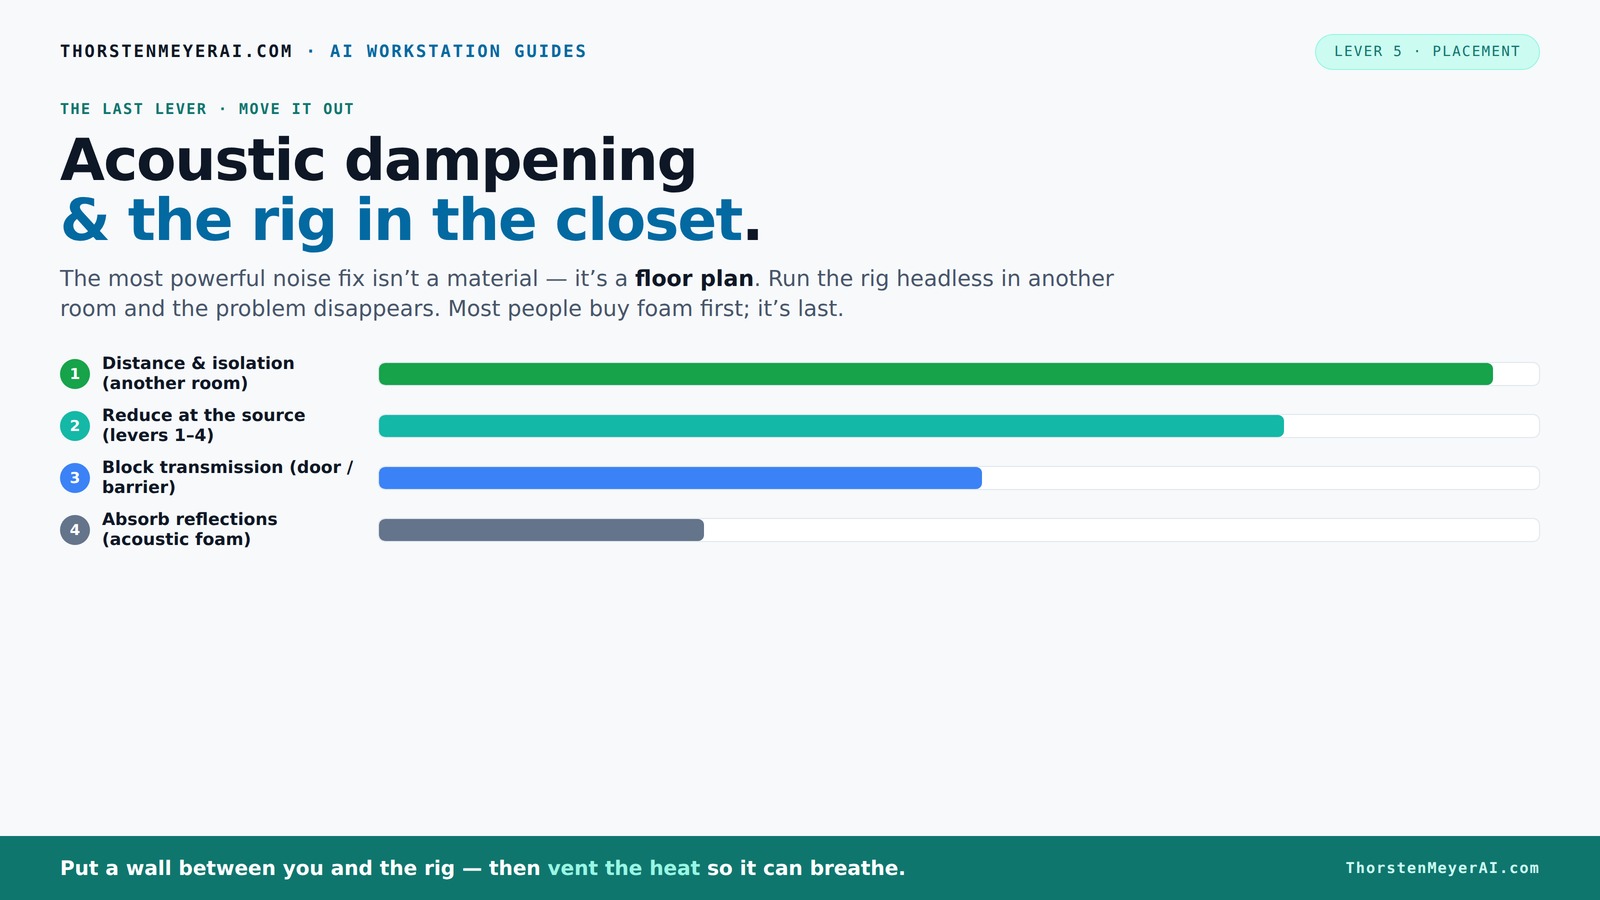
Acoustic dampening
& the rig in the closet.
The most powerful noise fix isn’t a material — it’s a floor plan. A rig you can’t hear because it’s in another room beats any amount of foam. Tap the approaches in Part 1 to see what actually works.
(another room)
(levers 1–4)
(door / barrier)
(acoustic foam)
Contain the noise, not the heat
Key Takeaways
- Moving your rig into a separate room or closet is the most effective way to eliminate noise pollution.
- Ventilation is critical—sealed spaces trap heat, risking hardware damage and throttling.
- Placement of acoustic panels at reflection points dramatically improves sound clarity.
- Bass traps in small rooms reduce low-frequency muddiness and improve recording quality.
- Sealing gaps around doors and outlets cuts down on sound leaks, boosting overall quietness.

Focusound 52 Pack Acoustic Foam Panels 1" x 12" x 12" Sound Proof Foam Panles Soundproofing Noise Cancelling Wedge Panels for Home Office Recoding Studio with 300PCS Double-Side Adhesive
Soundproofing - Acoustic foam panels triangular grooves structure for better noise absorption, helps to reduce and absorb unwanted...
As an affiliate, we earn on qualifying purchases.
As an affiliate, we earn on qualifying purchases.
Why Moving Your Rig Is the Most Effective Noise Solution
Distance is the number one tool in quieting your rig. When you put your AI workstation in another room—say, a basement or walk-in closet—its noise simply stops bothering you. You’re essentially creating a barrier that blocks sound, instead of trying to absorb or muffle it inside the same space. You can learn more about rig in the closet setups and how to optimize them.
Why does this matter? Because sound diminishes significantly with distance—roughly 6 dB for each doubling of distance in a free field. This means that even a modest separation can drastically reduce perceived noise levels. Moreover, moving the rig away prevents the need for complex, expensive soundproofing inside the same room, which often involves tradeoffs like reduced airflow or increased cost. It’s a practical, straightforward solution that leverages natural physics.
For example, if your GPU rig hums at 70 dB, moving it to a closet across the hall can cut the perceived noise down to near zero. You’re not just masking the sound—you’re eliminating the transmission entirely. This approach also minimizes the impact of noise on your daily environment—important in shared living or workspaces where noise restrictions or sensitivities are a concern.
Plus, with a wired connection and a bit of ventilation, you can operate your rig headless—leaving your workspace peaceful while the machine roars in a distant, enclosed spot. The key is choosing a location that balances distance, accessibility, and airflow needs, acknowledging that some tradeoffs in convenience might be worth the trade for quiet and reduced noise pollution.

be quiet! Silent Base 802 ATX Midi Tower PC Case | 3 Pre-Installed Pure Wings 2 Fans | Sound Insulated | Black | BG039
VERSATILITY: Interchangeable top cover and front panel cater to either maximum airflow or silent operation.
As an affiliate, we earn on qualifying purchases.
As an affiliate, we earn on qualifying purchases.
The 'Rig in the Closet' Setup: How to Make It Work Without Cooking Your Hardware
Placing your rig inside a closet sounds perfect—quiet and out of sight. But there’s a catch: heat. A sealed space traps hot air, causing the temperature to soar rapidly. This can lead to thermal throttling, reduced component lifespan, or outright hardware failure if not managed properly. The challenge is balancing soundproofing with effective cooling. For tips on managing acoustics and cooling, see acoustic treatment and setup guides.
To avoid overheating, you need to incorporate ventilation solutions that facilitate airflow without compromising acoustic isolation. Passive vents, exhaust fans, or duct systems can be designed to direct hot air out while preventing sound leaks. For instance, a well-designed vent with sound-dampening materials can maintain airflow and temperature stability without letting noise escape. Purpose-built soundproof cabinets often include these features, offering a compromise that enables quiet, cool operation—often reducing noise by up to ~36 dB while dissipating heat efficiently.
Consider the tradeoffs: adding ventilation may slightly reduce the soundproofing effectiveness but is essential for hardware longevity. For example, installing a quiet exhaust fan coupled with a vent hole can keep temperatures within safe limits, preventing throttling. Pair this with external CPU radiators or water cooling systems that transfer heat outside the enclosure, and your rig can operate at peak performance without overheating or excessive noise. The key is understanding that thermal management in an enclosed space is as critical as soundproofing; neglecting it can negate the benefits of noise reduction and damage your hardware over time.
Kingwin 120mm Silent Fan for PC Cases, CPU Coolers, Mining Rigs – Quiet Computer Cooling Fan with Long Life Sleeve Bearing, High Airflow Ventilation – Black CF-012LB
special high profile fan blades for maximum air flow
As an affiliate, we earn on qualifying purchases.
As an affiliate, we earn on qualifying purchases.
Placement Tricks: Where to Put Sound Absorbers for Best Results
Placement is everything when it comes to acoustic dampening. In a small, enclosed space like a closet, strategically position panels at reflection points—mainly behind the mic, on the side walls, and above your head. These spots catch the harshest reflections and tame the room’s echo. Proper placement reduces early reflections that can cause comb filtering and muddiness, leading to clearer audio recordings and reduced room echo. For more on optimal placement, check out acoustic dampening tips.
Why focus on reflection points? Because sound waves bounce off surfaces, creating echoes that muddy your audio. Placing sound treatment at these points intercepts these waves before they reach your ears or microphone, significantly improving clarity. Additionally, soft furnishings like blankets or rugs can absorb residual reflections, further reducing harshness. The goal is to create a controlled acoustic environment where direct sound dominates, and reflections are minimized.
Remember, coverage doesn’t need to be perfect—target around 20-40% of the reflective surface area that’s causing issues. Focus on the most problematic spots, such as behind the mic and on side walls, and you’ll notice a substantial difference in sound quality. Use a mirror to identify reflection points—any spot where you see your microphone reflected indicates a good place for treatment. This targeted approach maximizes effectiveness while minimizing unnecessary clutter and expense.

118” Wedge-Shape Foam Window Weather Stripping Door Seal Strip,Soundproofing Frame Winter Insulation Tape for Exterior Front Door,Noise Cancelling Window Inserts,Door Gap Filler Light Blocker,White
Upgraded Wedge Design: This window draft stopper features an upgraded wedge design, tapering from 5/32" to 11/32" (0.16"–0.35")...
As an affiliate, we earn on qualifying purchases.
As an affiliate, we earn on qualifying purchases.
Should You Use Bass Traps in a Small Closet?
Bass traps are often overlooked, but in a tiny closet, low-frequency buildup can cause your recordings to sound boomy or muddy. These deep rumbles tend to resonate within small, enclosed spaces where parallel surfaces reflect low-end energy back and forth, creating peaks and nulls in the frequency response. Without proper treatment, this results in a boxy, unnatural sound that can obscure detail and reduce clarity. Learn more about bass trapping and low-frequency control.
Adding bass traps in the corners effectively absorbs these low frequencies at their source. Corner placement is critical because low-end energy naturally accumulates there due to acoustic pressure zones. Foam bass traps made of dense materials or mineral wool are suitable options—they can be installed at the ceiling, floor, and wall junctions to reduce resonance. For example, placing a bass trap in each corner of the closet can significantly flatten the low-frequency response, resulting in tighter, more balanced recordings.
Don’t overthink it—just a few well-placed traps can make your recordings sound more professional and natural, even in a small, reflective space. The tradeoff is minimal effort for a noticeable improvement. For detailed advice on placement, see sound treatment strategies.rovement, especially if you notice muddiness or boominess during playback. Recognizing low-frequency issues—such as a boomy sound when speaking or recording—indicates the need for bass trapping. Proper placement and sufficient coverage at critical points help you achieve a clearer, more accurate sound with less muddiness and better overall fidelity.
How to Seal Gaps and Reduce Sound Leakage
Gaps around doors, outlets, and seams are the sneakiest sound leaks. Sealing these cracks with weatherstripping, acoustic sealant, and dense door seals drastically cuts down noise escaping or entering. These leaks act like tiny speakers, allowing sound to escape and compromise your soundproofing efforts. Addressing them is often the most cost-effective way to improve overall quietness.
For example, adding weatherstripping around your closet door can reduce noise leakage by dozens of decibels. Filling outlet gaps with acoustic putty or foam creates an airtight seal that prevents sound from sneaking through small openings. For seams and cracks, use acoustic sealant—flexible, non-hardening compounds that remain sound-absorbing and prevent vibration transfer. Additionally, installing door sweeps can block the gap at the bottom of the door, which is a common leak point.
Sealing isn’t just about soundproofing—it also improves thermal insulation, keeping your rig cooler and quieter. Properly sealed spaces retain temperature and humidity more effectively, reducing the need for aggressive cooling and preventing heat buildup that can cause throttling or hardware damage. The investment in sealing materials pays off in quieter operation, better thermal management, and increased equipment longevity.
What to Do When You Can’t Modify the Closet Space
If you can’t make structural changes, focus on portable solutions that can be easily moved and adjusted. Reflection filters, movable acoustic panels, and blankets are effective tools for shaping the sound environment without permanent alteration. These options allow you to customize your acoustic treatment based on your current setup and needs.
For example, a reflection filter behind your mic can significantly reduce room reflections and echoes, especially in rental spaces or temporary setups. Heavy blankets hung on walls or over the door absorb reflections and dampen echo, improving clarity without permanent installation. Portable acoustic panels can be repositioned easily to target specific reflection points or problem areas, giving you flexibility as your setup evolves.
This approach is cost-effective, non-invasive, and adaptable—perfect for renters or those who frequently move their gear. The key is strategic placement: identify the main sources of reflection and noise, then position these portable treatments to intercept sound waves. While not as comprehensive as built-in solutions, these methods can still produce a noticeable improvement in sound quality and noise control, especially when combined with proper placement and room awareness.
Common Mistakes to Avoid in Your Closet Studio Setup
Many rush into DIY treatments without proper planning or testing. Randomly placing panels without considering reflection points can lead to ineffective treatment and wasted effort. Over-sealing or sealing without proper ventilation can trap heat, risking hardware damage and reducing airflow, which can cause throttling or overheating. Ignoring low-frequency issues like bass buildup results in muddy recordings that require further correction later, complicating your workflow.
For instance, blocking every gap without providing airflow traps heat inside, which can damage components. Or, stuffing foam panels everywhere without addressing bass response can make audio sound unnatural or boomy. The key is to start with a plan: identify primary reflection points, seal gaps strategically, and add bass traps where low-end issues are evident. Always test your setup with actual recordings and listen critically to identify problem areas. Refining your approach based on real results ensures your treatment is effective and efficient, avoiding costly mistakes and unnecessary clutter.
Frequently Asked Questions
Do I need soundproofing or acoustic treatment?
Soundproofing blocks noise from escaping or entering a space, while acoustic treatment improves how sound behaves inside it. In most home setups, targeted acoustic treatment combined with placement is enough, unless noise pollution is a big issue.Where should I place acoustic panels in a closet?
Focus on reflection points—mainly behind the mic, on side walls where sound bounces, and above your head. Covering about 20-40% of reflective surfaces usually makes a big difference.Are bass traps necessary in a small closet?
Yes, especially if you notice boomy or muddy recordings. Bass traps in the corners absorb low-frequency buildup caused by parallel surfaces and small space resonances.Will moving blankets or a rug make a real difference?
Absolutely. Heavy blankets and rugs absorb reflections and soften harsh echoes, especially in tight spaces like closets. They’re affordable, portable, and surprisingly effective.How many panels do I need for a closet studio?
Aim for 20-40% surface coverage at reflection points. Start small—place a few panels behind the mic and on adjacent walls—and add more if needed after listening.Conclusion
Quiet, efficient, and cool—your closet can be the perfect home for a high-power AI rig. Just remember: it’s all about strategic placement, smart ventilation, and targeted treatment. With these tweaks, you get a powerhouse that hums quietly in the background while you focus on your work.
Don’t just stuff your closet with gear—treat it with purpose. That way, your setup isn’t just silent; it’s optimized for performance and longevity. Now, go make that quiet workspace a reality, and enjoy a world where noise no longer calls the shots.