Upgrading your old car with a projector headlight retrofit is a great way to give it a modern look and improve your visibility. You’ll want to choose compatible LED bulbs that fit your projector housing and guarantee proper wiring. Carefully install and aim the projector for a sharp, focused beam pattern that reduces glare and enhances safety. With the right tools and attention to detail, you can achieve professional results and enjoy better night driving—continue to explore for more detailed tips.
Key Takeaways
- Ensure compatibility of LED bulbs with your projector housing before installation.
- Properly align and aim the projector lens for a sharp, focused, and modern beam pattern.
- Use appropriate wiring, connectors, and mounting hardware to secure the projector and prevent misalignment.
- Test the headlight output thoroughly, adjusting the aim for optimal visibility and minimal glare.
- Follow manufacturer instructions carefully for wiring, heat management, and final adjustments to achieve the best results.

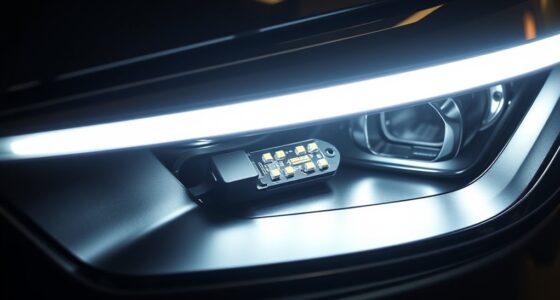
If you’re looking to upgrade your vehicle’s lighting, a projector headlight retrofit is an excellent way to improve visibility and style. By replacing your stock headlights with projector units, you gain a sharper, more focused beam pattern that enhances nighttime driving and adds a modern touch to your car’s appearance. Before diving into the retrofit process, it’s essential to understand LED bulb compatibility. Not all LED bulbs fit seamlessly into projector housings, so check your projector’s size and connector type. Many modern projectors are designed to work with standard H1, H4, or H7 bulbs, but some may require adapters or specific LED models. Confirming compatibility beforehand prevents frustration and guarantees maximum lighting performance. When selecting LED bulbs, look for ones with built-in heat sinks and drivers that can handle the projector’s power needs. This prevents flickering and overheating, prolonging the lifespan of both the bulbs and the retrofit components.
Once you’ve confirmed LED bulb compatibility, focus on retrofit installation tips. First, gather all necessary tools, including screwdrivers, wiring harnesses, and possibly a relay or resistor kit to manage electrical load. Carefully remove your stock headlight assembly, and inspect the housing for any damage or moisture. When installing the projector, ensure it’s securely mounted and aligned properly; improper alignment can cause glare for other drivers and reduce your visibility. Use mounting brackets or screws designed for your projector model, and double-check that the lens is centered and aimed correctly.
Securely mount and align the projector to ensure optimal visibility and prevent glare for other drivers.
Wiring is a critical step. Follow the manufacturer’s instructions to connect the projector to your vehicle’s electrical system. Usually, this involves hooking up the LED bulb socket to the existing wiring and ensuring the connection is solid and insulated to prevent shorts. For a cleaner look and improved durability, consider using heat-shrink tubing or electrical tape on exposed connections. Some retrofit kits come with a separate ballast or driver, which needs to be installed in a cool, dry location away from heat sources. Proper wiring and secure mounting reduce the risk of vibration or disconnection over time. Additionally, understanding the importance of contrast ratio can help you select a projector that offers better depth and clarity in various lighting conditions.
Finally, test your new headlights before final assembly. Turn on the lights and check for proper beam pattern, brightness, and cutoff line. Adjust the projector’s aim if necessary to avoid blinding oncoming traffic while maximizing your road coverage. Remember, a successful retrofit isn’t just about aesthetics; it’s about safety and functionality. With patience and attention to detail, your old car can shine with a sleek, modern beam pattern that improves visibility and turns heads on the road.
Frequently Asked Questions
Can Projector Headlights Be Installed on Any Vehicle?
You can’t install projector headlights on just any vehicle without considering aftermarket compatibility. Some cars may require modifications, making installation challenging. Check if your vehicle’s make and model support projector retrofits or if adapters are needed. It’s essential to evaluate these factors beforehand to avoid potential issues. If you’re willing to tackle installation challenges, ensure you have the right parts and tools for a smooth upgrade.
Are LED or HID Bulbs Better for Retrofit Projectors?
You’ll find that LED bulbs often outperform HID options in brightness and last longer, making them a smarter choice. While HIDs can deliver a brighter, more intense light, they usually involve more complex installation and require additional components. Think of it like choosing between a swift, efficient race car (LED) and a powerful, demanding classic (HID); LEDs are generally easier to install with less fuss, giving you a modern, crisp beam.
How Long Does the Retrofit Installation Typically Take?
The retrofit installation usually takes about 4 to 8 hours, depending on your experience and the vehicle’s complexity. To guarantee an ideal setup, allocate extra time for adjustments and troubleshooting. If you’re new to headlight retrofits, expect it to be closer to 8 hours. Having the right tools and patience helps you complete the installation smoothly, giving your car a modern and effective beam pattern.
Will Retrofitting Affect My Vehicle’s Warranty?
Did you know that about 30% of car owners who retrofit their headlights worry about warranty issues? Retrofitting can affect your warranty if it violates manufacturer restrictions, especially if it causes electrical or lighting problems. To avoid losing coverage, check your vehicle’s warranty policy and consult your manufacturer before proceeding. Staying within manufacturer restrictions guarantees your warranty remains valid while giving your old car a modern, improved beam pattern.
What Maintenance Is Required for Projector Headlights?
To keep your projector headlights working well, you should regularly clean the lens to prevent dirt buildup and ensure clear visibility. You’ll also need to replace the bulbs when they burn out to maintain peak brightness. Check for signs of condensation or fogging inside the headlight assembly and address any issues promptly. Proper maintenance helps extend the lifespan of your projector headlights and keeps your car looking sharp.
Conclusion
Now that you’ve upgraded your headlights with a projector retrofit, you’ll notice the sudden clarity and modern beam pattern that makes your old car feel brand new. It’s almost like your vehicle’s been waiting for this upgrade all along, quietly enhancing safety and style. So, next time you hit the road, remember — sometimes, a simple upgrade can unexpectedly transform your drive, proving that the small details often make the biggest difference.