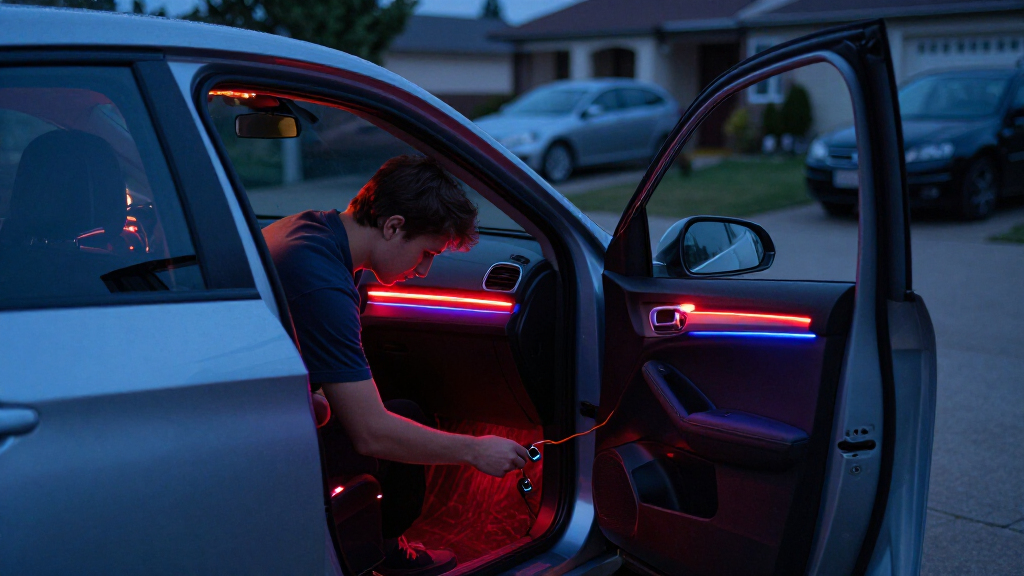
This guide walks you through installing LED accent lights inside your car — strips mounted under the dash, along door panels, or beneath seats — wired to the vehicle’s 12-volt electrical system with a manual switch or remote control. By the end, you will have interior accent lighting that turns on when you choose, with no loose wires, no blown fuses, and no damage to your trim.

Get business pricing on garage and car supplies
- Business-only prices and quantity discounts
- Tax-exempt purchasing
- Multiple users, one account, clear invoices

Jushope RGB Fiber Optic Car Interior LED Lighting Kit
- ✔ Control: Lotus Lantern app or RF remote
- ✔ Remote range: Up to 30 ft in open space
- ✔ Colors: 16 million

Nilight 4-Piece 48-LED RGB Car Interior Accent Light Kit with USB Power and Remote
- ✔ LED quantity: 48 (12 per strip)
- ✔ Power: USB, DC 5V
- ✔ Wattage: 10W
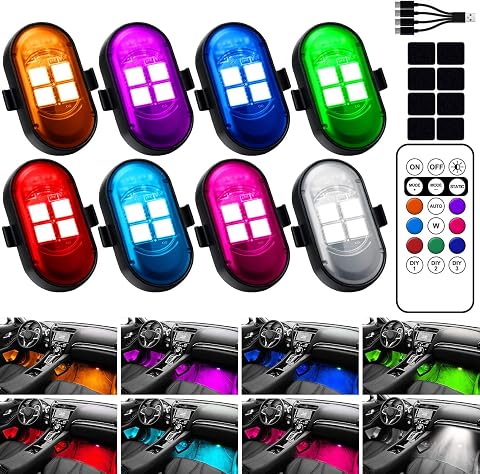
Rechargeable Wireless LED Vehicle Accent Lights with Remote
- ✔ Light source: LED
- ✔ Number of pieces: 8
- ✔ Colors: 8
This guide is for readers comfortable removing and reinstalling interior trim panels and doing basic 12-volt wiring. If you have never used a fuse tap or crimp connector before, read through the wiring steps twice before starting. Total time is typically two to four hours depending on how many strips you install and how much trim you need to remove.
You can buy all the materials at any auto parts store or online. Budget roughly $25 to $60 for a quality kit plus wiring supplies. Avoid the cheapest kits — they often fail within months and have poor adhesive that detaches in heat.
Difficulty: Intermediate | Time: 2-4 hours
What You’ll Need
Tools & Materials:
- LED strip kit (12V, with built-in resistors or a controller box)
- Fuse tap (add-a-circuit) and spare fuses matching your vehicle’s rating
- 16-18 gauge insulated wire in red and black
- Wire stripper and crimping tool
- Butt connectors or heat-shrink connectors and a heat gun or lighter
- Trim panel removal tool (plastic pry tool)
- Zip ties and zip tie base mounts with adhesive backing
- Isopropyl alcohol and microfiber cloth
- Multimeter or test light
- Electrical tape
- Drill with small bit (only if mounting a physical switch)
- Panel removal diagram or service manual for your vehicle (optional but helpful)
Knowledge:
- Locating your vehicle’s interior fuse box and identifying a fused circuit
- Basic 12V DC wiring: positive, ground, and why polarity matters for LED controllers
- Removing trim panels without breaking plastic clips
- Using a multimeter to check for voltage
Check three things before buying parts. First, confirm your kit runs on 12V DC — anything designed for household outlets will not work. Second, measure the lengths you need: under-dash runs are typically 24 to 36 inches per side. Third, decide on control method now: a physical switch, a remote, or a Bluetooth controller operated from your phone. Bluetooth kits are easiest because they need no drilled switch and no visible controller.
If your vehicle is under warranty, check whether DIY electrical work affects coverage before starting.
Jushope RGB Fiber Optic Car Interior LED Lighting Kit
The Jushope kit earns our top ranking because it’s the only option here that scales with your ambition. At its simplest, it plugs into a USB port like the Nilight. But unlike the Nilight, it can also be hardwired to a DC 5–24V supply, which means a cleaner install with no dangling cables — something the Nilight simply cannot do and the wireless pods avoid only by removing power entirely.Its control system is also a class above. Rather than a single IR remote, you get the Lotus Lantern app plus an RF remote with a 30-foot range, so passengers can run the show from the back seat. With 16 million colors and 29 dynamic modes, it offers dramatically more variety than the Nilight’s fixed RGB palette or the wireless pods’ 8 colors. The fiber optic strips themselves are a genuine advantage: they can be cut and bent to fit installation gaps, letting you tuck light lines along dash seams and door contours in a way rigid adhesive strips can’t match.The tradeoffs are real, though. Runs over 100 inches may need an additional LED source to maintain brightness at the far end — a cost and complexity the other picks don’t carry. And because fiber optics reward careful planning, you should test everything before committing to adhesive placement. Compared with the plug-and-play Nilight, this kit demands more effort but returns a noticeably more polished, factory-adjacent result. It also travels well beyond cars, suiting trucks, RVs, boats, and home interiors, with high-temperature and short-circuit protection adding peace of mind for permanent installs.
Pros:
- 16 million colors and 29 dynamic modes for deep customization
- Dual control via Lotus Lantern app and 30-ft RF remote
- USB or hardwired DC 5–24V power for flexible installation
- Cuttable, bendable fiber optic strips fit tight gaps and contours
- Built-in high-temperature and short-circuit protection
Cons:
- Runs over 100 inches may need an additional LED for maximum brightness
- Lights should be tested before final installation, adding setup time
- More involved install than plug-and-play USB strip kits
Best for: Drivers who want a polished, highly customizable ambient setup and don’t mind spending extra installation effort — especially those willing to hardwire.
Not ideal for: Anyone wanting a five-minute, plug-in-and-forget install, or vehicles without practical routing for fiber optic runs.
Bottom line: The most capable and flexible kit here — the clear choice for a permanent, custom-look interior glow.
“The most capable and flexible kit here — the clear choice for a permanent, custom-look interior glow.”
Nilight 4-Piece 48-LED RGB Car Interior Accent Light Kit with USB Power and Remote
If the Jushope is for the committed installer, the Nilight is for everyone else. This kit strips the concept down to its most accessible form: four strips of 12 LEDs each, a USB controller, and an IR remote, all running at a modest 10W. You’re not getting 16 million colors or an app — but you are getting multi-color RGB lighting with a sound-active mode that pulses to music or voice, which is the feature most buyers actually want from accent lights.Where it beats the Jushope is simplicity and cost of entry. There’s no app pairing, no remote-range considerations, no fiber routing decisions — press the remote and go. Compared with the wireless rechargeable pods, it offers a more traditional under-dash look with continuous power, so you’ll never hunt for a charging cable mid-road-trip. The strips are also versatile enough to double as TV or home accent lighting, which softens the value proposition further if you might reuse them.The limitations define who should pass. Because it’s tied to a 5V USB port, cable routing is your problem, and the IR remote needs a line of sight to the controller — a real constraint if you tuck it under the dash. Installation relies on adhesive backing, so surface prep matters, and the fixed 6000K-based RGB output can’t match the Jushope’s palette depth. Still, for a first dip into interior lighting, this pick makes the most sense: it delivers the core experience without the commitment of a hardwire job.
Pros:
- Sound-active mode responds to music or voice
- USB-powered for use in cars and at home
- Includes four strips and a wireless IR remote
- Water-resistant and easy to install with adhesive backing
Cons:
- Requires a 5V USB port within reach of the strips
- IR remote needs line of sight to the controller
- Adhesive installation depends on clean mounting surfaces
Best for: First-time buyers and budget-conscious drivers who already have a USB port in the cabin and want quick, sound-reactive color.
Not ideal for: Perfectionists chasing a seamless factory look, or vehicles without an accessible 5V USB port.
Bottom line: The easiest, lowest-commitment way to get music-reactive interior color — best for first-timers and tight budgets.
“The easiest, lowest-commitment way to get music-reactive interior color — best for first-timers and tight budgets.”
Rechargeable Wireless LED Vehicle Accent Lights with Remote
This option takes the opposite bet from the other two: instead of more colors and modes, it removes the single biggest barrier to entry — wiring. These eight compact pods charge over USB-C and mount with hook-and-loop pads or rubber bands, so there’s nothing to plug in, route, or hardwire. For leased vehicles, motorcycles, ATVs, and bicycles, that freedom is decisive; neither the Nilight’s USB tether nor the Jushope’s power options can follow you onto a bike frame.The flexibility extends to placement. Because each pod is removable and IP65 water-resistant, you can reposition them for different moods or move them between vehicles entirely — something a glued-down strip kit can’t do without damage. Eight colors, 10 modes, and three brightness levels cover the basics of ambient lighting, and up to 8 hours of runtime is enough for most evenings.But the wireless convenience exacts a clear price in capability. With 8 colors versus the Jushope’s 16 million and the Nilight’s app-free simplicity versus full remote control from the driver’s seat, this is a functionally simpler system. Runtime is also situational: brighter colors and dynamic modes drain the battery faster than the headline figure, and each pod needs periodic recharging. Adhesive performance depends on a clean, dry surface, so dusty dashboards and saddlebags are the enemy. We’d position this as a complement or entry point rather than a competitor to a full interior kit — but for the wire-averse buyer, nothing else here comes close.
Pros:
- Wireless design requires no vehicle wiring at all
- USB-C rechargeable with up to 8 hours of runtime
- Multiple colors, modes, and brightness settings
- Removable hook-and-loop or rubber-band mounts allow repositioning
Cons:
- Runtime varies with color, brightness, and lighting mode
- Only 8 colors versus 16 million on app-controlled kits
- Adhesive performance depends on a clean, dry mounting surface
Best for: Leasers, motorcyclists, cyclists, and off-road vehicle owners who want accent lighting with zero wiring and full removability.
Not ideal for: Drivers wanting continuous, always-on ambient lighting or deep color customization.
Bottom line: The pick for total wiring freedom — accept fewer colors and charging duty in exchange for mount-anywhere versatility.
“The pick for total wiring freedom — accept fewer colors and charging duty in exchange for mount-anywhere versatility.”
As an Amazon Associate we earn from qualifying purchases.
Before You Start
Disconnect the negative battery terminal before doing any wiring. This prevents short circuits while you tap into the fuse box. Use a 10mm wrench to loosen the clamp, and tuck the cable aside so it cannot contact the terminal.
Plan your layout before cutting or sticking anything. Decide where each strip goes, where the controller box will sit (under the driver’s side dash is typical), and where the power wire will connect to the fuse box. Dry-fit the strips with masking tape first and view them at night — accent lighting looks very different in daylight versus dark. Strip placement aimed downward at the footwells gives the best effect with no glare in your eyes.
Warning: never wire LED power directly to a circuit tied to airbags, ABS, or the engine computer. Use interior lighting or accessory circuits only.
Step-by-Step Instructions
Step 1: Plan strip placement and control location
Tape each LED strip in its planned position using masking tape, then sit in the driver’s seat at night and evaluate the look. Aim strips so light spills onto the floor or footwells, not into your eyes or onto reflective surfaces. Choose a mounting spot for the controller box within reach of all strips’ wire lengths — usually tucked against the under-dash panel on the driver’s side, near the fuse box.
Tip: Keep strips at least 2 inches away from any moving parts: pedals, steering column, seat rails, and parking brake cables.
Check: You can trace a wire path from every strip to the controller location without stretching wires taut or crossing moving parts.
Step 2: Disconnect the battery
Turn off the ignition and remove the key. Open the hood and loosen the negative battery terminal clamp with a 10mm wrench. Lift the cable off the terminal and position it so it cannot fall back into contact. Wait ten minutes before working near airbag circuits so residual capacitors discharge.
Tip: Some vehicles will need radio codes or window re-learning after battery reconnection. Have your radio code handy if your car requires one.
Check: The negative cable is fully clear of the terminal and interior lights are dead when you open a door.
Step 3: Prepare and clean mounting surfaces
Remove the masking tape and wipe every mounting surface with isopropyl alcohol on a microfiber cloth. Let it dry fully. The adhesive on LED strips bonds only to clean, dry, smooth surfaces. If a mounting point is textured plastic or fabric, plan to use the mounting clips included with most kits, or adhesive zip-tie bases, instead of the strip’s own backing.
Tip: Do not touch the adhesive backing with your fingers while positioning. Hold strips by their edges.
Check: Each surface is dry, dust-free, and cool to the touch before you stick anything.
Step 4: Mount the LED strips
Peel the adhesive backing a few inches at a time and press each strip into place, working along its length with firm thumb pressure for ten seconds every few inches. Route strips in straight lines along panel edges where they stay hidden. Where adhesive alone is unreliable, secure strips with the kit’s mounting clips screwed or adhered every 8 to 10 inches.
Tip: Never bend an LED strip sharply across a corner — creasing the strip breaks the circuit traces. Curve strips gently around bends or cut and reconnect them with solderless connectors at the marked cut lines only.
Check: Every strip is fully seated, follows its planned path, and cannot be seen from the normal seating position — only its light should be visible.
Step 5: Route and connect the strip wires
Run each strip’s wire back to the controller box location, following existing wiring channels under the dash and door sills. Secure wires every 8 to 12 inches with zip ties or adhesive-backed zip-tie bases, keeping them away from pedals and steering column movement. Strip 1/4 inch of insulation from each wire end and connect them to the controller’s output terminals or lead wires using butt connectors: match red to red (positive) and black to black (ground). Crimp each connector firmly and give it a light tug test.
Tip: Tuck wires under trim edges with a plastic pry tool rather than letting them hang loose. Loose wires near pedals are a safety hazard.
Check: No wire sags into the footwell, all connections hold a firm tug, and each strip’s polarity matches the controller markings.
Step 6: Tap power from the fuse box
Locate your interior fuse box (check the owner’s manual — usually under the dash on the driver’s side or in the kick panel). Use the fuse diagram to identify an accessory circuit that is powered only when the ignition is on, such as the cigarette lighter or an interior accessory fuse. Remove that fuse with puller pliers, insert it into the fuse tap, and place a new fuse of the same amperage in the tap’s second slot for the LED circuit. Crimp the tap’s wire to your red power lead and route it to the controller’s positive input.
Tip: Use a multimeter to confirm the circuit you chose is ignition-switched: it should read 12V with the ignition on and 0V with it off. This stops LEDs from draining your battery overnight.
Check: The fuse tap seats fully in the box, and both fuses sit at their correct amperage ratings printed on the fuse box cover.
Step 7: Ground the circuit
Find a clean metal ground point near the controller — an existing ground bolt under the dash or a bare, unpainted section of the body frame. Crimp a ring terminal onto your black ground wire and secure it under the bolt. If no bolt is available, sand a small spot of paint off bare metal and attach the ring terminal with a self-tapping screw.
Tip: Grounding to painted or coated metal causes flickering lights. The connection point must be bare metal.
Check: The ring terminal is tight, metal-to-metal, and the wire cannot be shifted by hand.
Step 8: Reconnect the battery and test
Reconnect the negative battery terminal and tighten the clamp. Turn the ignition to the accessory position. Use the remote, app, or physical switch to power the strips on. Cycle through colors and brightness levels and check every strip lights evenly. Test that lights turn off with the ignition off, then turn them on and off five times in a row to shake out loose connections.
Check: All strips light evenly, respond to the controller, and power down completely when the ignition is switched off.
Step 9: Reinstall trim and finalize
Reinstall any trim panels you removed, pressing clip locations firmly until they seat with a click. Do a final inspection at night: look for visible strips, glare in the mirrors, or wires hanging into footwells. Move the steering wheel, press every pedal, and pull the parking brake to confirm nothing interferes. Zip-tie any remaining slack wire up and out of sight.
Check: The interior looks factory-stock with the lights off, and only soft accent light is visible with them on.
Common Mistakes to Avoid
- Wiring directly to the battery without a fuse or ignition-switched circuit — Always use a fuse tap on an ignition-switched accessory circuit. Direct battery connections drain the battery overnight and offer no short-circuit protection.
- Sticking LED strips to dirty or textured surfaces — Wipe every surface with isopropyl alcohol first. On textured or curved plastic, use mounting clips or zip-tie bases instead of relying on the strip adhesive alone.
- Reversing polarity on the controller input — Confirm red goes to the fuse tap (positive) and black to the metal ground point before reconnecting the battery. Reversed polarity destroys many LED controllers instantly.
- Running wires loosely through the footwell or across pedals — Route wires along existing harness channels under trim and secure them with zip ties every 8 to 12 inches. Any wire within reach of your feet is a hazard and must be relocated.
Troubleshooting
Problem: Strips do not light at all after reconnection
Solution: Check the fuse tap first: the original fuse may be in the wrong slot or blown. Test the tap output with a multimeter. Then verify the ground connection — loosen, clean, and retighten the ring terminal. Finally, check that the controller’s input polarity is correct.
Problem: Lights flicker or dim unevenly
Solution: Flicker almost always means a poor ground or a loose crimp. Wiggle each connector while the lights are on — when the flicker changes, you have found the fault. Recrimp or solder the bad connection and confirm the ground is on bare metal.
Problem: One strip works but others do not
Solution: The failed strip’s connection is the issue, not the power supply. Check the butt connector at the strip’s wire, then inspect the strip itself for a crease or cut in the flexible circuit. If the strip is damaged, cut at the nearest marked line and rejoin with a solderless connector.
Problem: Strips fall off in hot weather
Solution: Heat softens strip adhesive. Clean and remount using the kit’s mounting clips or adhesive zip-tie bases every 8 inches, which hold the strip mechanically instead of relying on glue alone.
What Success Looks Like
Your installation is complete when all of the following are true. Every strip lights evenly and responds to your switch, remote, or app. The lights power off with the ignition, so the car can sit unused without the battery draining. With the lights off, the interior looks stock: no visible strips, no exposed wires, nothing sagging into the footwells. Pedals, parking brake, and seat movement all act unobstructed. All wiring connections hold a firm tug test, and the fuse tap carries two correctly rated fuses. Finally, sit in the driver’s seat at night and drive around the block: the accent light should glow in the footwells without causing glare on the windshield or in the mirrors. If light reflects off the dash onto the glass, reposition or dim the strips before regular night driving.
Next Steps
After the install, check the strips after one week of driving — heat and vibration often reveal weak adhesive or a loose crimp, and both are easy fixes while the trim is still familiar. Re-check connections every few months if you live in a hot climate. If you want to extend the system, most controller kits support adding a second set of strips; connect them in parallel to the controller outputs, never in a single long daisy chain, which causes voltage drop and dimming at the far end. If you later notice battery drain, unplug the fuse tap and measure current draw with a multimeter — a healthy install draws well under half an amp with the strips on. For anything beyond simple accent lighting, such as footwell lights tied to door switches or music-reactive modes, plan a second project rather than modifying this circuit incrementally.
Frequently Asked Questions
Will interior LED accent lights drain my car battery?
Not if wired correctly. A typical strip set draws 1 to 3 amps. By tapping an ignition-switched circuit, power cuts off when you remove the key, so nothing draws overnight. Avoid wiring directly to the battery unless you add an inline switch and fuse you remember to turn off.
Are LED accent lights inside a car legal?
Rules vary by region. In most places, accent lighting inside the cabin is legal as long as it does not mimic emergency vehicle colors (red and blue facing forward) or project distracting light that other drivers can see. Keep brightness moderate, keep light aimed downward at footwells, and avoid red or blue in forward-facing positions. Check local regulations if unsure.
Can I install these without cutting or drilling anything?
Yes. Use a fuse tap for power instead of splicing factory wires, ground under an existing bolt, tuck wires under trim edges with a pry tool, and choose a remote or Bluetooth kit so no switch hole needs drilling. The entire install can be fully reversible.
Why do my LED strips only partially light or show the wrong colors?
Partial lighting usually means a damaged section of the strip’s flexible circuit from a sharp bend or a cut in the wrong place, or a loose connector at that strip. Wrong colors on RGB strips point to a bad connection on one of the color wires. Inspect and reseat the connector at the affected strip first before replacing anything.
Can I cut LED strips to length?
Yes, but only at the marked cut lines, usually shown as a scissor icon or copper pads between groups of LEDs. Cutting anywhere else destroys that section. Rejoin cut pieces with solderless 4-pin connectors or by soldering and heat-shrinking the joints.
Fall Picks
fall essentials
As an affiliate, we earn on qualifying purchases.